Saturday, September 29, 2012

Homeschooling after loss


Struggling to find ways to cope after the loss of a child is hard enough, but having to homeschool in the midst of grief seems near impossible.

I am in the midst of a grief session. Until now, I had never heard the term before, I don’t think anything could have prepared me for it either.

After Joaquim passed away, I think I stayed in the shock part of my grief for a long time. I had 3 living children who needed me, and I found that diving straight back into my daily routine was a welcome distraction. We homeschooled with a new fervour, and everything seemed fine.

I threw myself into projects, lesson blocks and party plans. 

Joaquims birthday fell slam bang in the midst of those plans.

My forward momentum skidded to a halt.

And it has remained there……..stuck in limbo…… while I stand back reeling from the shock and disbelief. Has it already been a year?.

Our baby died.
This is my reality.
There is no getting over it. I did not have a cold.
 We had a baby brother!

Our baby brother who was with us one minute, and gone the next.

Our baby brother who’s tiny hands we had held as we formed a family circle every morning in circle time.

Our baby brother, who we carried around the garden, showing him the weaverbirds making nests in the trees.

Our baby brother, who we ran outside with the first time it rained to show him the rain fairies bringing drops of water to the seed babies.

Our baby brother who listened with wide eyes as we practiced recorder, the same songs over and over.

Our baby brother, who slept peacefully in the Moby wrap hugging mommy’s chest as lessons were taught and stories were told.

Our baby brother, who I can still see on the lounge ottoman, gazing in wonderment at his busy little family.

Our baby brother, our pride and joy, who was stolen from us in the blink of an eye by Acute Lymphoblastic Leukaemia,.

Tell me? How do you go back to normal after that?

There is no going back.

There is no moving on.

There is only moving with…..
Moving with the memories so fresh in our minds, moving with the heartache so deep in our souls.

I have taken the the time to embrace all of my feelings, all of my memories. I have let the tears fall, and I have spoken of little else for the last month.
I have realised that I cannot continue the way things were before.

I need a new rhythm. And the panick starts to creep in as yet another week has goes by without lessons, but then I realise, we are learning something far more important right now.
We are learning to cope with just breathing in our home after loss.
The home he was born into and the home so full of the empty space that his memories occupy.

I don’t have the luxury of spending months in bed grieving for him. I have to pick up the pieces, and start preparing the next lesson block. Next week we are doing man and animal in Grade 4, and St Francis in Grade 2. We will start our circle times by lighting a candle for Joaquim, and embracing our loss as a part of our new life. I will look out for the little signs that he brings me every day, and be inspired by his memory. I will look at things the way he did, with newborn wonderment at the simple miracles in life. The birds in there nests, the silkworms spinning their caccoons, my daughter singing and dancing with careless abandon, and my beautiful boys.
I will stretch my arms as wide as I can and embrace this new space that I have to learn from the beginning how to hold for my family.

Sunday, September 16, 2012

Norse Mythology part 1


From : "Mission of the Folk Souls" Rudolf Steiner

".......In primitive times, as we have shown in the case of the Scandinavian and Germanic peoples, the "I" was revealed clairvoyantly to humanity. According to tradition this "I" ws bestowed upon humanity by an Angelic Being, Donar or Thor, who stands midway between the human being and the Folk Soul. We have seen that individuals still felt themselves to be ego-less, devoid of personality; they looked upon the "I" as a gft from the spiritual world"

I had heard so much about the brilliance of the Norse Mythology block, that we couldnt wait to start. It feels like this block was tailor made for our family, with our love for Vikings and Mythology and swordfighting and medieval festivals. The wonderful thing about waldorf, and planning ahead, is that you can prepare the groundwork long before you actually begin. My son had shown a great affinity with these stories for a long time, even more so as he approached his 10th year, his inner developement apparent through his emerging personality.
We had started attending medieval festivals about 2 years ago, as some very close friends of ours are professional Orustra(viking) swordsmen, and they often exhibit their skills in public arenas, dressed in authentic viking gear.
They also carry years of wisdom and knowedge, and are always ready to answer any questions on Odin, Viking heritage or the correct way to hold a hammer..

We had also signed my son up for winter school at the Michael Mount waldorf school. It was a one week course where he did woodword and metal forging. At the end of the week he had hand carved a beautiful dolphin scene for our Angel Joaquim remembrance table, as well as forged a dagger, a knife and an assegai (african sword) out of iron.


So needless to say, when Grade 4 rolled along, we were eagerly anticipating the lesson block.
We worked mainly from D'aulares' book of norse myths, and compared a few creation myths and legends to find similarities.

 We aquired The Bible of Illuminated Letters, and a caligraphy set from Mercurius with gold leaf paper to practice writing some ancient script.

Some of my chalkboard drawings during the block. Yggdrasil and the 3 norns.

We incorporated the three norns into some language practice, representing past, present and future. From the Christopherus Language arts book we used some fun examples to converting the tenses.
Urd-what was-the past
Verdanade-What is- the preseent
Skuld- what will be- the future

Some sentences :
Ymir and the cow lived in Ginungagap (written in past tense, from Urd)
Then we move between the tenses playing with the words. Ymir and the cow lived in the Ginungagap. ( Verdanade- present)
and then Ymir and the cow will live in the Ginungagap (Skuld- future)

We followed a typical waldorf sequence of telling the story on day 1, then we would compose a few lines together and draw or paint a picture, then on day 2, my son would retell the story as we walked through the garden, and we would finish composing the paragraph, do gramatical corrections, and then write into his main lesson book. This worked very well, and as my son likes to work at a slow pace, we got through about 3 stories a week. He really enjoyed the drawings. We also played around with form drawing celtic knotwork and used this to make borders around his pages. Here are a few pages from his main lesson book.


 His 10th birthday rolled along in the middle of the lesson block. He had asked for a violin and a chess board for his birthday, and we were fortunate enough to get them both for him. He has been doing really well at his music lessons, and his music teacher measured him for a violin. He has such long arms that a full size Violin fitted comfortably on his shoulder. He was thrilled with his gfts, and it is clear he appreciated them immensly. The chess board we picked up from a retired couple who were selling second hand collecters item chessboards. It helps to search sites like www.junkmail.co.za or www.bidorbuy.co.za to find good deals.The chess pieces are individualy hand painted, and are all knights, kings and queens from the medieval era.
His birthday party theme was easy! Vikings! Our dear friends from Orustra agreed to come and entertain the boys in exchange for tea and cake! We set up an arena in our garden and planned a quest for the boys. It took about 2 weeks of prep work which we incorporated into our homeschooling crafting days. We made each boy a shield, viking helmet and hammer that we cut out of cardboard boxes that we had collected from recycling areas. We glue gunned them together and duct taped them together and even stapled them together. It was really all trial and error until we got them perfect. 11 of each!

We made a huge Pinyata out of a guitar box. The tutorial we found here.http://www.instructables.com/id/How-to-make-a-pinata/

Then we tackled making a Viking lonboat out of card-board boxes. 
The weather was acting unpredictably, so we built the longboat in our lounge, everyone doing their bit to help with the sticking, painting and design work.  


The cake we made out of cupcakes, following this tutorial.http://runs-like-doe.blogspot.com/2012/06/viking-party-cupcakes.html
We planned a quest for the boys. It was written on a scroll that my hubby (dressed in medieval garb) anounced in his booming voice across the garden:
"hear ye! hear ye!
you have been selected to go on a quest to slay the dragon.
for this quest you will need:
Bravery
Wisdom
Fearlessness
Endurance
and Strength

you have 5 tasks to complete to prove that you are worthy

to prove you are brave, you must enter the abandoned unicorn castle,
and fight your way through the briar patch,
through the dark cave,
and then cross the raging waterfall bridge.
If you make it through the maze, you will come upon the dragons lair,
there you must creep in as silent as a mouse,
and take from the dragons treasure box,
a scroll with an ancient writing code.

to prove your wisdom, you must desipher this code,
and find a medalion on the yggdrasil tree with your name on it.

to prove your fearlessness, you will be required to eat a magic worm.

the test of endurance will be age old viking games.
1. viking longboat race
2. musical vikings
3. viking pass the parcel

the last test, that of endurance, will be the jousting of the pinyata.
where you will combine your skills and slay the dragon.

may you be greatly rewarded for your courage, young vikings!"


When the guests arrived they were given their shields which they had to decorate inside the longboat, with runic stamps we had made from kitchen sponges. Once they had all arrived my husband gathered them all together and read from the scroll.
They made their way through the course we had plotted out in the garden. The unicorn castle was one we had built for my daughters birthday a month before out of refirgerator boxes. We placed the castle in front of a large bush that our rabbits live in, and the boys had to crawl through the bush, and they came out in to our trampoline that we had covered with fabric(the dark cave), once through that, they had to climb over the "bridge" which was a garden bench draped in blue silks.
The dragons lair was our tent that we had decorated, and inside we had draped silks and voils to make chambers. In the last chamer, one of the older boys was dressed in a dragons costume, guarding his treasure chest which was filled with the scrolls we had made earlier.
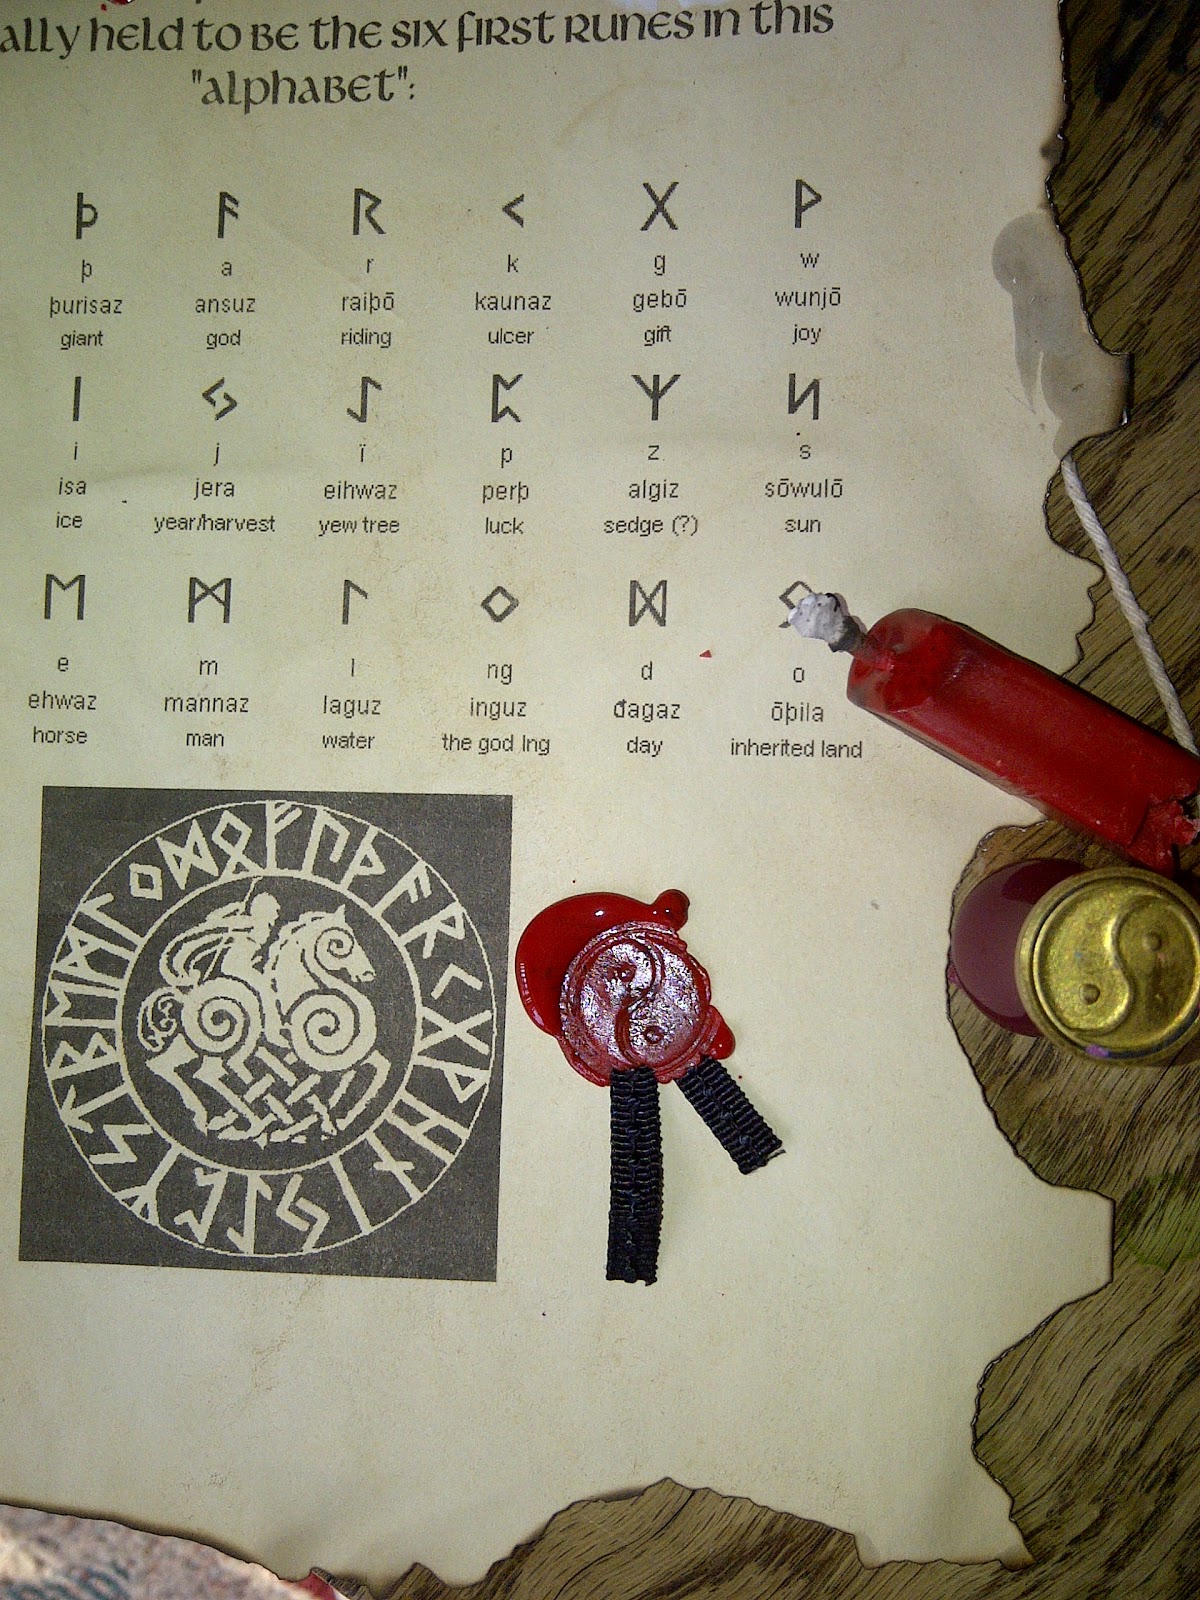
 Each scroll had the ancient runic alphabet code, we had stained the paper with tea, burtn the edges and put a wax seal on it.
The boys took their scroll and headed back into the garden to find the Yggdrasil tree, that had all the medalions hanging on the branches. The medals we had carved out of wood, and engraved each childs name in runic.
Once they had achieved this, they were handed their axes and helmets, and they joined the Orustra vikings in the arena.


 Lunch was "long boat" dogs, and viking juice.


 It was a great success!
We are looking forward to the second block, which we will do after our fractions lesson block and our man and animal block.


Tuesday, January 10, 2012

A very Potter Christmas

This Christmas was inspired by our lucky aquisition earlier this year of the entire Harry Potter Lego collection from a lady who was selling the contents of her toy store. We bought the lego for an absolute bargain, the only drawback was that it all came in one big box all mixed together. So over the following months, I painstakingly seperated the lego into sets and boxed them in preperation for Christmas 2011.

Thus came the inspiration for our Theme, a "Harry Potter" Christmas.
I had read the first book to the boys, The philosophers stone, and so as advent began we read "the chamber of secrets". They were allowed to watch the first movie on Christmas eve ( we screened the scary bits with Voldemort).

On Christmas morning the boys awoke to this:
Hedgwig in a cage, holding two acceptance letters to Hogwarts :

The list of student requirements thus became the inspiration for their gifts. All the gifts were wrapped in brown paper and twine, and the uniform was inside this wizarding trunk.

For the uniform we simply bought plain white school shirts, and grey school trousers, grey sleaveless sweaters and black school shoes.
I made the cloaks myself.
The cloaks were really simple to make.
WHAT YOU NEED:
  • measuring tape
  • fabric of your choice
  • straight pins
  • calculator
  • pencil or chalk
  • ruler
  • scissors
  • matching thread
  • sewing machine
INSTRUCTIONS:
Making the cloak
  1. Decide how long you want the cloak. Use a measuring tape to measure from the base of your neck across your shoulders. Then measure from your shoulder to your ankles. You will need to buy enough fabric to make a square the same dimentions as this measurement. The cloak itself is made from a circle cut from a folded square of fabric. For example : if you need a cloak 36 inches (.9m) long, you will need to buy 2 yards (1.8m) of fabric at least 72 inches (1.8m) wide. If necessary, you can sew together two widths of yardage. Purchase an extra 1/2 yard (45.7cm) of fabric for the hood.
  2. Folod the square of fabric in half lengthwise, then crosswise. Use straight pins to pin the four layers together.
  3. Use a measuring tape to measure around the base of the neck. Use a calculator to divide this measurement by 3.14; then divide the result by 2. This will give you the correct measurement to create the neckline. Mark an arc on the fabric from the folded centre using a ruler and pencil or chalk.
  4. Mark an arc for the bottom edge of the cloak, measuring from the centre fold a distance equal to the length of the cape.
  5. Cut on the marked lines through all the layers.Cut one of the folded edges for the centre front opening.
Making the hood
  1. Measure from the base of your neck to the top of your head. Add 6 inches (15cm) to this measurement. This will determine the height of your hood. Mark a rectangle on the fabric, using the neck to the top of head measurement and the measurement around the base of the neck, plus 6 inches as the two sides of the rectangle.
  2. On the long side of the rectangle, sew a straight line of 1/2 inch (1.3 cm) stitches about 1/2 inch from the edge. Use this line of stitching to gather the edge of the rectangle to fit the neckline. Pin together the right sides of the gathered edge and the cape neckline. Stitch the two layers together with a 1/2 inch seam. Finish the raw edge by trimming close to the seam.
  3. Turn the attached hood right sides together. Match the free corners, and use straight pins to pin the top edges together. Stitch together using a 1/2 inch (1.3cm) seam. Trim the raw edges close to the seam.
  4. Hem the bottom edge and opening edges of the cape and hood.
  5. Decorate the cloak as desired.
Isabella loves pink, so i used light pink crushed velvet and decorated it with sparkly pink material.
Once I had wrapped the cloaks in brown paper, I glued on the Madam Maulkins logo which I also downloaded off the internet.


The wands were really fun to make. I used paintbrushes of various lengths, and decorated them with Sculpey Oven bake clay. I made one with black clay and green glitter. One with black clay and gold glitter. One with cream clay and gold glitter. Decorate as desired, then bake in a cool oven for one hour. I made a wizarding amulet to match each wand, by decorating a crystal with the oven bake clay. I handmade the boxes out of hard cardboard, and decorated them with scrapbooking paper or watercolour paintings from during the year. I cut out a piece of foam for inside the box and covered it in velvet to lay the wand upon. Each wand came with a certificate of ownership and a description of wand length, core properties etc.
To finish it off, I downloaded the Olivanders logo off the internet, printed it onto cardboard and glued it to the top of the box.
"Wingardium Leviousa"


We just had to make a Nimbus 2000 for the boys. Even though first years are not allowed to take broom in the first year, Hary Potter did recieve one when he made it onto the Quidditch team. We found this tutorial and they came out beautifully.
To continue on the quidditch theme, I found Three varous sized solid wooden balls to use as Quaffels, and I made the snitch myself using silver beads from the bead shop, attaching wings to it and spray painting it gold.
For their stationary, I found these wooden pencils and pens, and I wrote their names on each in Runic with a gold pen, and attached a leather strap to hang around their necks. The wooden fountain pen is from mecurious as well as the ink pot (that I labelled with "flourish and botts")

The potions cabinet I was lucky enough to come across in our craft shop. I collected as many different vials and bottles as I could find, and got creative with the ingredients. For example, "phoenix tears" was actually vinegar, and when combined with "bicorn horn" which was bicarbinate of soda, you get a fabulous reaction. In south africa we are very fortunate to come across "potions pots", (poytjie pots) in just about every store, so we got two small ones for the boys, and labeled them from "the leaky cauldren".
The boys have been doing very well with their knitting this year, so I downloaded a simple Scarf tutorial off the internet and bought the colours for a Gryffendor scarf that they can make themselves.
A few extra ideas that we came up with were to wrap up jelly beans as "bertie botts every flavour beans", I found some gold coin chocolates that I labeled from Gringotts bank, The internet is full of ideas, and free tutorials.

We had a "magical " Christmas.

Happy 2012 to you all!
See you on the Hogwarts express!